- 首页
- /
- 开发技术
-
 常用fastboot命令 android系统分区boot 引导区,存放内核和ramdisk的分区(BIOS) recovery recovery分区(PE) system 系统分区(C盘) userdata 数据分区(D盘) cache 缓存分区列出fastboot设备fastboot devices重启相关 fastboot reboot #重启⼿机 fastboot reboot-bootloader #重启到bootloader模式,其实就是再次进入fastboot擦除相关(erase)fastboot erase boot #擦除boot分区(擦了引导就没了,会卡在第一屏,) fastboot erase recovery #擦除recovery分区 fastboot erase system #擦除system分区(擦了系统就没了,会卡在第二屏) fastboot erase userdata #擦除userdata分区(可擦,清空数据用) fastboot erase cache #擦除cache分区(可擦,清空数据用)写⼊分区(flash)fastboot flash boot boot.img #写⼊boot分区 fastboot flash recovery recovery.img 写⼊recovery分 fastboot flash system system.img #写⼊system分区获取⼿机的全部信息 fastboot getvar all其它:fastboot -w reboot #清除手机中所有数据然后重启,等同于系统中的“恢复出厂设置”,或Recovery模式的“清空所有数据”操作fastboot boot #临时启动镜像,不会烧录和替换内核文件到存储中,类似于在PC端用U盘启动PE系统fastboot oem device-info #输出当前BL锁状态(非MTK)fastboot oem lks #输出当前BL锁状态(MTK)fastboot oem reboot-recovery #重启进入Recovery模式fastboot oem poweroff #拔掉数据线后关机fastboot oem lock #重新上BL锁并清空所有数据(需未开启root)fastboot oem unlock #解除BL锁并清空所有数据(小米手机必须绑定账号,主动申请解锁,等待7天,使用工具才行)fastboot oem edl #进入高通9008模式,无需工程线或主板短接,可无视BL锁线刷
 -
 随身WIFI+Deb 篇一:系统安装和基本设置方法 安装的Debian固件地址我安装的是酷安 @快乐的我531 的版本,内核更新到了5.18,文件系统是btrfs下载地址:https://www.coolapk.com/feed/37616461?shareKey=YTNkNDNkZjk0NGIwNjJmMjY0ZjY~NDIS联网问题:参考文章:https://lxnchan.cn/ufi4gstick.html刷完Debian或OpenWRT之后如果能正确连接上WiFi并正常上网,但是usb连接电脑却无法通过usb共享上网,任务管理器中可以识别到Android ADB Interface,则可以尝试以下操作。按照下图操作 : 1、右键Android ADB Interface,选择属性; 2、点击驱动程序选项卡,更新驱动程序; 3、浏览我的电脑以查找驱动程序; 4、让我从计算机上的可用驱动程序列表中选择; 5、找到“网络适配器”; 6、左侧厂商找到“Microsoft”,右侧找到“基于远程NDIS的Internet共享设备”; 7、在跳出的警告对话框中选择“是”。 如果在第五步没有找到“基于远程NDIS的Internet共享设备”,则可以尝试先将ADB驱动全部卸载(请谨慎操作)使设备变为未知设备后再重试。远程连接ssh的软件推荐1、windows putty:https://www.putty.be/latest.html Aechoterm:https://ec.nantian.com.cn finalshell:http://www.hostbuf.com/downloads/finalshell_install.exe 2、安卓 JoiceSSH:酷安有专业版下载 https://www.coolapk.com/feed/27804587?shareKey=ZTlmZTc5YmI2ZjBiNjJmMjZkNzA~ ssh登录系统(不同的包不一样)重启后使用ssh连接使用地址:192.168.68.1登录名:root 或 user密码:1如需修改登录密码 用root登录 passwd 用户名,例如: passwd root 输入两次密码即可 修改user的密码只需要执行 passwd user 即可如果不需要默认的user账户(建议不要删),可以执行命令删除:会有一个提示“未找到”,不用管,此时已经删掉了userdel -r user扩容分区(仅博主刷的这个btrfs包需要执行)执行扩容btrfs filesystem resize max查看扩容结果,4G版本的棒子/dev/mmcblk0p14总容量应该是3.4Grf -h连接wifissh 输入:nmtui进入网络管理界面 ,然后参考文章操作:参考文章:https://www.coolapk.com/feed/37612079?shareKey=MTlhMzM0ODkxM2FjNjJmMjY1ZmM~安装蓝牙支持暂时没有想到蓝牙的用途,可以不用安装sudo apt install bluetooth关机方法参考debian包作者的说法:btrfs相对ext4来说断电丢失数据概率大一些,因此尽量不要直接拔电源,而是执行:sudo systemctl poweroff等待led灯熄灭之后拔掉usb
随身WIFI+Deb 篇一:系统安装和基本设置方法 安装的Debian固件地址我安装的是酷安 @快乐的我531 的版本,内核更新到了5.18,文件系统是btrfs下载地址:https://www.coolapk.com/feed/37616461?shareKey=YTNkNDNkZjk0NGIwNjJmMjY0ZjY~NDIS联网问题:参考文章:https://lxnchan.cn/ufi4gstick.html刷完Debian或OpenWRT之后如果能正确连接上WiFi并正常上网,但是usb连接电脑却无法通过usb共享上网,任务管理器中可以识别到Android ADB Interface,则可以尝试以下操作。按照下图操作 : 1、右键Android ADB Interface,选择属性; 2、点击驱动程序选项卡,更新驱动程序; 3、浏览我的电脑以查找驱动程序; 4、让我从计算机上的可用驱动程序列表中选择; 5、找到“网络适配器”; 6、左侧厂商找到“Microsoft”,右侧找到“基于远程NDIS的Internet共享设备”; 7、在跳出的警告对话框中选择“是”。 如果在第五步没有找到“基于远程NDIS的Internet共享设备”,则可以尝试先将ADB驱动全部卸载(请谨慎操作)使设备变为未知设备后再重试。远程连接ssh的软件推荐1、windows putty:https://www.putty.be/latest.html Aechoterm:https://ec.nantian.com.cn finalshell:http://www.hostbuf.com/downloads/finalshell_install.exe 2、安卓 JoiceSSH:酷安有专业版下载 https://www.coolapk.com/feed/27804587?shareKey=ZTlmZTc5YmI2ZjBiNjJmMjZkNzA~ ssh登录系统(不同的包不一样)重启后使用ssh连接使用地址:192.168.68.1登录名:root 或 user密码:1如需修改登录密码 用root登录 passwd 用户名,例如: passwd root 输入两次密码即可 修改user的密码只需要执行 passwd user 即可如果不需要默认的user账户(建议不要删),可以执行命令删除:会有一个提示“未找到”,不用管,此时已经删掉了userdel -r user扩容分区(仅博主刷的这个btrfs包需要执行)执行扩容btrfs filesystem resize max查看扩容结果,4G版本的棒子/dev/mmcblk0p14总容量应该是3.4Grf -h连接wifissh 输入:nmtui进入网络管理界面 ,然后参考文章操作:参考文章:https://www.coolapk.com/feed/37612079?shareKey=MTlhMzM0ODkxM2FjNjJmMjY1ZmM~安装蓝牙支持暂时没有想到蓝牙的用途,可以不用安装sudo apt install bluetooth关机方法参考debian包作者的说法:btrfs相对ext4来说断电丢失数据概率大一些,因此尽量不要直接拔电源,而是执行:sudo systemctl poweroff等待led灯熄灭之后拔掉usb -
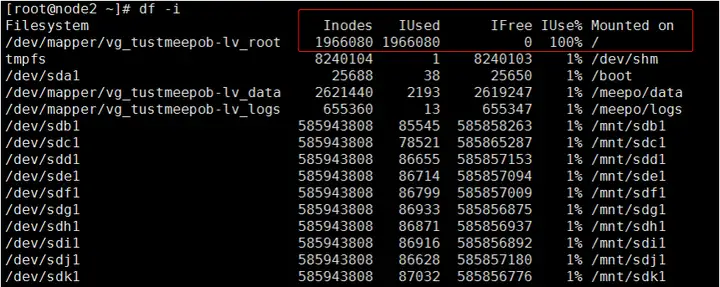
 Linux中inode使用率满了解决办法( inode节点满处理方法) 一位群友分区存储空间还没有用完,但是,却不能创建目录和文件了,查看/分区的,结果发现Inodes文件数量被占满了,Inodes使用率过高达到了100%。命令如下:原因:大多数情况下是由于文件数量过多所引起的,只需要删除无用的就好了。解决方法1、查看并删除临时文件ls -lt /tmp | wc -l find /tmp -type f -exec rm {} \;2、删除0字节的文件,这些文件也会占用inodefind /home -type f -size 0 -exec rm {} \;3、查找大文件,并进行适当删除根据我的个人经验,前两个占用inode的使用率很少,主要是查找大文件这个步骤,可以查看哪些占用inode使用率最高?具体如下:第一步:查看某个目录下的文件数量我这里为什么要循环/var/*?这是根据个人经验吧!毕竟你的服务器情况只有自己最清楚。[root@node2 ~]# for i in /var/*; do echo $i; find $i |wc -l; done 结果:我们通过查看,只有 /var/spool/ 目录下文件数量最多。第二步:按照第一步的思路,继续查看 /var/spool/ 目录下的文件数量[root@node2 ~]# for i in /var/spool/*; do echo $i; find $i |wc -l; done结果:发现 /var/spool/postfix/ 目录下有1889027的文件数。原因:问:我这里为什么 /var/spool/postfix/ 下面会生成那么多的文件数量?答:这是因为crontab定时任务所导致的,定时任务执行后发送告知联系人,但是发送失败就会在postfix下生成,所有就产生了这么多的垃圾文件。第三步:既然知道了原因,那就删除多余的垃圾文件,方法如下:首先,进入到miaildrop目录下进行清理这些无用文件[root@node2 maildrop]# cd /var/spool/postfix/maildrop [root@node2 maildrop]# pwd /var/spool/postfix/maildrop [root@node2 maildrop]#其次,我先通过 rm 直接删除,结果报错参数列表太长:[root@node2 maildrop]# rm -rf *最后,我只好使用类似于 ls | xargs -n 500 rm -rf 的方式进行删除:[root@node2 maildrop]# ls | xargs -n 500 rm -rf第四步:再次查看Inodes文件数是否被释放?Inodes使用率是否还是100%?总结:Linux中Inodes满了的原因有很多,不同的场景情况也是不一样的,Inodes占用100%是很正常的,也会经常遇见这种情况。上面所有的操作步骤只是给大家一个解决问题的思路,哪怕你以后再遇到inode使用率满了这个类似的问题,只要按照此文章原理,相信你一定可以去自己解决的。
 -
 在硬盘已分区后如何在设置交换分区swap 划分swap分区1、查看当前内存和swap使用情况free -h2、开启swapswapon -a3、关闭swapswapoff -a4、swap推荐设置4G以内的物理内存,SWAP 设置为内存的2倍。4-8G的物理内存,SWAP 等于内存大小。8-64G 的物理内存,SWAP 设置为8G。64-256G物理内存,SWAP 设置为16G。5、系统使用swap的规则阈值实际上,并不是等所有的物理内存都消耗完毕之后,才去使用swap的空间,什么时候使用是由swappiness 参数值控制。查看当前设置cat /proc/sys/vm/swappinessswappiness=0 的时候表示最大限度使用物理内存,然后才是 swap空间。swappiness=100 的时候表示积极的使用swap分区,并且把内存上的数据及时的搬运到swap空间里面。临时修改sysctl -w vm.swappiness=60永久修改,在/etc/sysctl.conf 文件里添加如下参数:vm.swappiness=60sysctl -p6、使用文件作为swap交换分区生成swap-file,大小为1Gdd if=/dev/zero of=/swap-file bs=1M count=1024将交换文件格式化为swap分区,记录UUIDmkswap /swap-fileSetting up swapspace version 1, size = 8388604 KiBno label, UUID=e7d93441-2606-4cd0-a5bd-c983f579d6cb永久生效,配置/etc/fstab,更新UUID,新增/swap-file配置/swap-file swap swap defaults 0 07、启动swap分区登录后复制chmod 0600 /swap-fileswapon /swap-file
 -
 通过宝塔面板的 linux 工具箱,如何管理 swap 交换分区? swap虚拟内存,是衍生于linux世界的一个概念,类似于Windows的虚拟内存。当内存不足的时候,可以把一部分硬盘空间虚拟成内存使用,从而解决内存容量不足的情况。那么centos也是一款linux的分支系统,也会使用swap。不过鉴于大多数人员看到centos的命令行,就会莫名的恐慌。那么,如果恰巧安装了宝塔面板的话,也许这里有个更好的设置swap的途径了,那就是宝塔面板的linux工具箱。  在本文中,锐羽将要说明的就是,有关宝塔面板的linux工具箱设置swap的事情。本文测试环境:centos7.5,宝塔面板5.9.0,linux工具箱1.4。安装linux工具箱这个工具箱是个免费的软件,在宝塔面板的软件列表的第二页,才能找到。大家多点击几次分页。安装过程很简单,大家都会操作。设置swap交换区不过,锐羽在这里先几句丑话啊。这个设置swap的结果,似乎可能不咋地。所以大家要有心理准备。通过宝塔面板,设置swap交换区的界面如下。界面下方,有设置的说明。锐羽先抄过来,放在下面。 swap是Linux下的虚拟内存,设置适当的swap可增加服务器稳定性 建议swap容量在真实内存容量的1.5倍左右,若您的服务器内存大于4GB,可设1-2GB的固定值 swap文件默认保存在/www/swap,设置前请确保磁盘空间够用 若您不需要swap,请将容量设为0 OVZ虚拟架构机器不可用此功能 这里,有个争议点:建议swap容量在真实内存容量的1.5倍左右。有的人说,这个是宝塔写错了,1.5倍应该是0.5倍。额,苏南大叔则倾向于:"宝塔写的,就是对的"。那么,我的机器内存是2G,那么就不妨设置个3G的交换?不过,有一点,是需要说明的。swap是个总和的概念,centos上面也许有多个swap的交换区。他们的总和,就是上面所说的swap的容量。而linux工具箱上面的swap设置值,仅仅是设置其中的一部分,即www/swap这个文件的。所以,如果可能新手会理解错误,设置的过多。不需要设置宝塔面板的swap的理由锐羽的设置宝塔面板的swap分区为零,这是基于以下几点理由的。 宝塔的工具箱设置的swap分区位于/www/swap。那么锐羽的centos机器的系统盘,本来就只有可怜的8.5G,如果再设置3个G的swap分区。那么系统盘就岌岌可危了。 /www/swap,如果ln软连接到数据盘的话。使用linux工具箱设置后,/www/swap又会变为真实文件,而不是一个软连接了。 在数据盘/home/swap,也是可以设置交互区的。并不需要非要和系统盘/www/swap过不去。对吧? 手工设置swap交换区这个实际上就要敲命令,修改/etc/fstab文件了。那么在这里就可以看到:宝塔面板所说的/www/swap交换区的设定了。具体见下图最后一条语句。修改/etc/fstab文件,把系统默认的/www/swap字样,更换为/home/swap新的交换分区。保存之后,宝塔面板的/www/swap交换区,就名存实亡了。利用数据盘里面的空间,想怎么换就怎么换吧。这个新的/home/swap是用mv命令移动而来的。相关命令如下:swapoff /www/swap sudo mv -f /www/swap /home/ chmod 600 /home/swap swapon /home/swapPlain textCopy设置swap文件的权限值600,这个是系统提示修改的。大家记得执行一下即可。手工设置的方式方法,似乎也不难。可能关键点就是swapon命令了。
通过宝塔面板的 linux 工具箱,如何管理 swap 交换分区? swap虚拟内存,是衍生于linux世界的一个概念,类似于Windows的虚拟内存。当内存不足的时候,可以把一部分硬盘空间虚拟成内存使用,从而解决内存容量不足的情况。那么centos也是一款linux的分支系统,也会使用swap。不过鉴于大多数人员看到centos的命令行,就会莫名的恐慌。那么,如果恰巧安装了宝塔面板的话,也许这里有个更好的设置swap的途径了,那就是宝塔面板的linux工具箱。  在本文中,锐羽将要说明的就是,有关宝塔面板的linux工具箱设置swap的事情。本文测试环境:centos7.5,宝塔面板5.9.0,linux工具箱1.4。安装linux工具箱这个工具箱是个免费的软件,在宝塔面板的软件列表的第二页,才能找到。大家多点击几次分页。安装过程很简单,大家都会操作。设置swap交换区不过,锐羽在这里先几句丑话啊。这个设置swap的结果,似乎可能不咋地。所以大家要有心理准备。通过宝塔面板,设置swap交换区的界面如下。界面下方,有设置的说明。锐羽先抄过来,放在下面。 swap是Linux下的虚拟内存,设置适当的swap可增加服务器稳定性 建议swap容量在真实内存容量的1.5倍左右,若您的服务器内存大于4GB,可设1-2GB的固定值 swap文件默认保存在/www/swap,设置前请确保磁盘空间够用 若您不需要swap,请将容量设为0 OVZ虚拟架构机器不可用此功能 这里,有个争议点:建议swap容量在真实内存容量的1.5倍左右。有的人说,这个是宝塔写错了,1.5倍应该是0.5倍。额,苏南大叔则倾向于:"宝塔写的,就是对的"。那么,我的机器内存是2G,那么就不妨设置个3G的交换?不过,有一点,是需要说明的。swap是个总和的概念,centos上面也许有多个swap的交换区。他们的总和,就是上面所说的swap的容量。而linux工具箱上面的swap设置值,仅仅是设置其中的一部分,即www/swap这个文件的。所以,如果可能新手会理解错误,设置的过多。不需要设置宝塔面板的swap的理由锐羽的设置宝塔面板的swap分区为零,这是基于以下几点理由的。 宝塔的工具箱设置的swap分区位于/www/swap。那么锐羽的centos机器的系统盘,本来就只有可怜的8.5G,如果再设置3个G的swap分区。那么系统盘就岌岌可危了。 /www/swap,如果ln软连接到数据盘的话。使用linux工具箱设置后,/www/swap又会变为真实文件,而不是一个软连接了。 在数据盘/home/swap,也是可以设置交互区的。并不需要非要和系统盘/www/swap过不去。对吧? 手工设置swap交换区这个实际上就要敲命令,修改/etc/fstab文件了。那么在这里就可以看到:宝塔面板所说的/www/swap交换区的设定了。具体见下图最后一条语句。修改/etc/fstab文件,把系统默认的/www/swap字样,更换为/home/swap新的交换分区。保存之后,宝塔面板的/www/swap交换区,就名存实亡了。利用数据盘里面的空间,想怎么换就怎么换吧。这个新的/home/swap是用mv命令移动而来的。相关命令如下:swapoff /www/swap sudo mv -f /www/swap /home/ chmod 600 /home/swap swapon /home/swapPlain textCopy设置swap文件的权限值600,这个是系统提示修改的。大家记得执行一下即可。手工设置的方式方法,似乎也不难。可能关键点就是swapon命令了。 -
 解决v2ray安装之后无法连接问题 从服务器中查看v2ray的运行状态,发现v2ray是运行着的:root@VJP:~# systemctl status v2ray ● v2ray.service - V2Ray Service Loaded: loaded (/etc/systemd/system/v2ray.service; enabled; vendor preset: enabled) Active: active (running) since Wed 2018-01-03 19:11:26 CST; 1s ago Main PID: 16814 (v2ray) Tasks: 6 (limit: 4915) CGroup: /system.slice/v2ray.service └─16814 /usr/bin/v2ray/v2ray -config /etc/v2ray/config.json Jan 03 19:11:26 VJP systemd[1]: Started V2Ray Service. Jan 03 19:11:26 VJP v2ray[16814]: V2Ray v3.5 (die Commanderin) 20171228 Jan 03 19:11:26 VJP v2ray[16814]: An unified platform for anti-censorship. 再查看端口占用,发现v2ray并没有监听我们的公网IP,只监听了一个IPV6:root@xxx:~# netstat -apn | grep v2ray tcp6 0 0 :::21xxx :::* LISTEN 22194/v2ray unix 3 [ ] STREAM CONNECTED 788043 22194/v2ray 看来可能是v2ray获取IP导致的问题,这样我们能不能指定IP让v2ray去监听?放Google搜了一把,发现v2ray还真有这个配置,只是v2ray官方文档也没有很详细说这个问题,也只是带了一下,但是好歹也给我们提供了一种解决方式。按照文档中说的,我们可以在配置文件中添加一个listen字段,用于指定v2ray监听指定的IP。v2ray默认配置文件在/etc/v2ray/conf.json,我们只需编辑这个文件并添加一行就行了:vim /etc/v2ray/config.json { "log" : { "access": "/var/log/v2ray/access.log", "error": "/var/log/v2ray/error.log", "loglevel": "warning" }, "inbound": { "port": 21xxx, "protocol": "vmess", "listen":"12.34.56.78", <------就是这一行 "settings": { "clients": [ { "id": "e59b0cba-204c-4d58-85a5-xxxxxxxxxxxxxxx", "level": 1, "alterId": 64 } ] } }, "outbound": { "protocol": "freedom", "settings": {} }, "outboundDetour": [ { "protocol": "blackhole", "settings": {}, "tag": "blocked" } ], "routing": { "strategy": "rules", "settings": { "rules": [ { "type": "field", "ip": [ "0.0.0.0/8", "10.0.0.0/8", "100.64.0.0/10", "127.0.0.0/8", "169.254.0.0/16", "172.16.0.0/12", "192.0.0.0/24", "192.0.2.0/24", "192.168.0.0/16", "198.18.0.0/15", "198.51.100.0/24", "203.0.113.0/24", "::1/128", "fc00::/7", "fe80::/10" ], "outboundTag": "blocked" } ] } } 将上述listen字段中的12.34.56.78替换成真实IP,保存,退出,然后用v2ray测试配置文件是否正确:root@xxx:/etc/v2ray# /usr/bin/v2ray/v2ray --test --config /etc/v2ray/config.json V2Ray v3.5 (die Commanderin) 20171228 An unified platform for anti-censorship. Configuration OK. 这样表示配置文件没什么问题,重启即可:systemctl restart v2ray再次检查v2ray的端口监听情况:root@xxx:~# netstat -apn | grep v2ray tcp 0 0 104.238.xxx.xxx:191xx 0.0.0.0:* LISTEN 16814/v2ray unix 3 [ ] STREAM CONNECTED 3918255 16814/v2ray 这样,v2ray就配置成功了。
 -
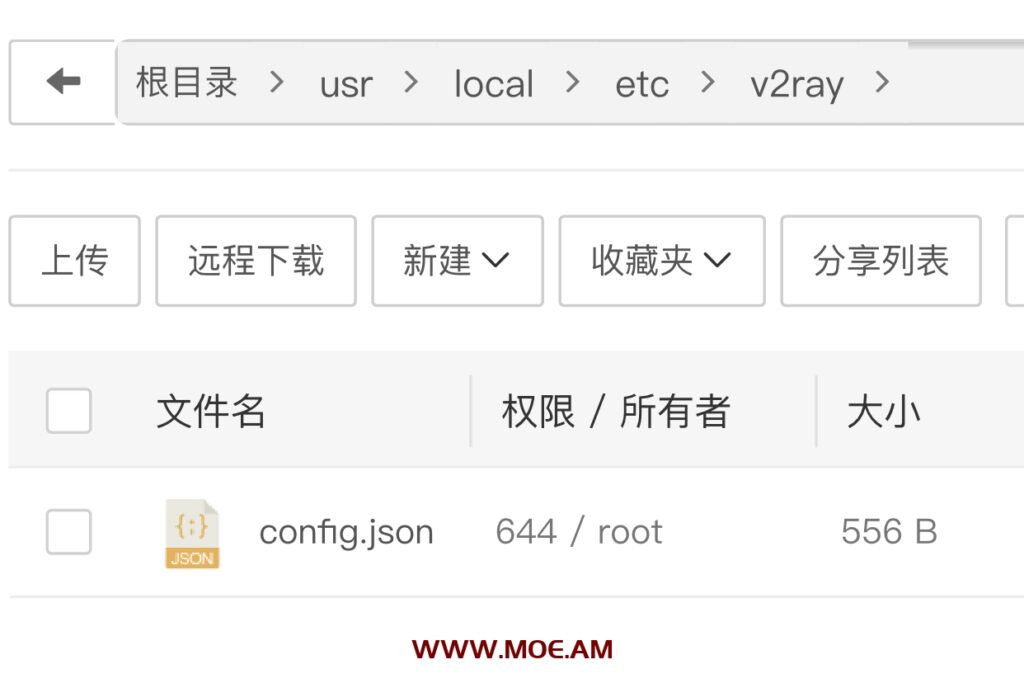
 宝塔面板搭建V2ray详细教程 准备工作:准备一个域名和一台服务器,并将域名解析到服务器。Freenom 可以注册免费域名搭建好宝塔并安装nginx宝塔和nginx完成以后,回到vps SSH窗口执行命令bash <(curl -L https://raw.githubusercontent.com/v2fly/fhs-install-v2ray/master/install-release.sh)执行完后,回到宝塔面板,左侧文件,依次打开,如下图所示编辑config.json这个文件,打开文件后先清空里面的内容,再粘贴下面代码进去并保存{ "inbounds": [ { "port": 8888, "listen": "127.0.0.1", "protocol": "vmess", "settings": { "clients": [ { "id": "4346de4e-6224-4f02-a388-b00f9970d5aa", "alterId": 4 } ] }, "streamSettings": { "network": "ws", "wsSettings": { "path": "/happy" } } } ], "outbounds": [ { "protocol": "freedom", "settings": {} } ], "routing": { "rules": [ { "type": "field", "ip": [ "geoip:private" ], "outboundTag": "blocked" } ] } }代码中的4346de4e-6224-4f02-a388-b00f9970d5aa可以变更一下。比如换几个数字。相当于是个密码。但是格式必须相同(小火箭里的UUID指的就是这串代码)然后宝塔新建一个网站(域名是文章开头你解析的),如下图所示(数据库,PHP都无所谓)首先申请SSL证书(这步不用说了吧)然后点击配置文件,在配置文件最顶部添加以下代码# 定义变量 map $http_upgrade $connection_upgrade { default upgrade; '' close; }然后大概这个位置(如下图)添加以下代码#v2配置文件location /happy { proxy_pass http://127.0.0.1:8888; proxy_redirect off; proxy_http_version 1.1; proxy_set_header Upgrade $http_upgrade; proxy_set_header Connection "upgrade"; proxy_set_header Host $http_host; proxy_set_header X-Real-IP $remote_addr; proxy_set_header X-Forwarded-For $proxy_add_x_forwarded_for; }保存回到vps SSH窗口启动v2raysystemctl start v2ray设置开机自启systemctl enable v2rayOK,V2ray服务端已全部完成下面说ios小火箭配置:安卓客户端V2rayNG:v2rayNG_1.6.16.apk安卓V2rayNG配置:Windows客户端V2rayN:v2rayN.zipWindows V2rayN配置:解压运行V2rayN文件夹里的V2rayN.exe,提示未安装.NET Framework的话去Microsoft官网下载.NET Framework4.6以上的版本安装好再重新运行V2rayNV2rayN左上角点击服务器,添加Vmess协议,配置就按照上面安卓的照葫芦画瓢v2ray其他常用命令## 启动systemctl start v2ray## 停止systemctl stop v2ray## 重启systemctl restart v2ray## 开机自启systemctl enable v2ray##卸载v2ray先停止v2raysystemctl stop v2raysystemctl disable v2ray再执行一键移除bash <(curl -L https://raw.githubusercontent.com/v2fly/fhs-install-v2ray/master/install-release.sh) --remove
 -

-
 Debian设置国内(阿里云、网易)镜像源 Debian默认的官方软件仓库服务器在海外,速度较慢,如果是国内服务器可以将软件源设置为国内镜像仓库,比如阿里云、网易的镜像源。备份建议先备份自带的软件源,命令如下:#备份自带的软件源 mv /etc/apt/sources.list /etc/apt/sources.list.bak然后新建/etc/apt/sources.list文件,添加以下内容:deb https://mirrors.ustc.edu.cn/debian stretch main contrib non-free #deb-src http://httpredir.debian.org/debian stretch main contrib non-free deb https://mirrors.ustc.edu.cn/debian stretch-updates main contrib non-free #deb-src http://httpredir.debian.org/debian stretch-updates main contrib non-free deb https://mirrors.ustc.edu.cn/debian stretch-backports main contrib non-free #deb-src http://httpredir.debian.org/debian stretch-backports main contrib non-free deb https://mirrors.ustc.edu.cn/debian-security/ stretch/updates main contrib non-free #deb-src http://security.debian.org/ stretch/updates main contrib non-free #163镜像站 deb http://mirrors.163.com/debian/ buster main non-free contrib deb http://mirrors.163.com/debian/ buster-updates main non-free contrib deb http://mirrors.163.com/debian/ buster-backports main non-free contrib deb http://mirrors.163.com/debian-security/ buster/updates main non-free contrib deb-src http://mirrors.163.com/debian/ buster main non-free contrib deb-src http://mirrors.163.com/debian/ buster-updates main non-free contrib deb-src http://mirrors.163.com/debian/ buster-backports main non-free contrib deb-src http://mirrors.163.com/debian-security/ buster/updates main non-free contrib #华为云镜像站 deb https://mirrors.huaweicloud.com/debian/ buster main contrib non-free deb https://mirrors.huaweicloud.com/debian/ buster-updates main contrib non-free deb https://mirrors.huaweicloud.com/debian/ buster-backports main contrib non-free deb https://mirrors.huaweicloud.com/debian-security/ buster/updates main contrib non-free deb-src https://mirrors.huaweicloud.com/debian/ buster main contrib non-free deb-src https://mirrors.huaweicloud.com/debian/ buster-updates main contrib non-free deb-src https://mirrors.huaweicloud.com/debian/ buster-backports main contrib non-free #腾讯云镜像站 deb http://mirrors.cloud.tencent.com/debian/ buster main non-free contrib deb http://mirrors.cloud.tencent.com/debian-security buster/updates main deb http://mirrors.cloud.tencent.com/debian/ buster-updates main non-free contrib deb http://mirrors.cloud.tencent.com/debian/ buster-backports main non-free contrib deb-src http://mirrors.cloud.tencent.com/debian-security buster/updates main deb-src http://mirrors.cloud.tencent.com/debian/ buster main non-free contrib deb-src http://mirrors.cloud.tencent.com/debian/ buster-updates main non-free contrib deb-src http://mirrors.cloud.tencent.com/debian/ buster-backports main non-free contrib #中科大镜像站 deb https://mirrors.ustc.edu.cn/debian/ buster main contrib non-free deb https://mirrors.ustc.edu.cn/debian/ buster-updates main contrib non-free deb https://mirrors.ustc.edu.cn/debian/ buster-backports main contrib non-free deb https://mirrors.ustc.edu.cn/debian-security/ buster/updates main contrib non-free deb-src https://mirrors.ustc.edu.cn/debian/ buster main contrib non-free deb-src https://mirrors.ustc.edu.cn/debian/ buster-updates main contrib non-free deb-src https://mirrors.ustc.edu.cn/debian/ buster-backports main contrib non-free deb-src https://mirrors.ustc.edu.cn/debian-security/ buster/updates main contrib non-free #阿里云镜像站 deb http://mirrors.aliyun.com/debian/ buster main non-free contrib deb http://mirrors.aliyun.com/debian-security buster/updates main deb http://mirrors.aliyun.com/debian/ buster-updates main non-free contrib deb http://mirrors.aliyun.com/debian/ buster-backports main non-free contrib deb-src http://mirrors.aliyun.com/debian-security buster/updates main deb-src http://mirrors.aliyun.com/debian/ buster main non-free contrib deb-src http://mirrors.aliyun.com/debian/ buster-updates main non-free contrib deb-src http://mirrors.aliyun.com/debian/ buster-backports main non-free contrib #清华大学镜像站 deb https://mirrors.tuna.tsinghua.edu.cn/debian/ buster main contrib non-free deb https://mirrors.tuna.tsinghua.edu.cn/debian/ buster-updates main contrib non-free deb https://mirrors.tuna.tsinghua.edu.cn/debian/ buster-backports main contrib non-free deb https://mirrors.tuna.tsinghua.edu.cn/debian-security/ buster/updates main contrib non-free deb-src https://mirrors.tuna.tsinghua.edu.cn/debian/ buster main contrib non-free deb-src https://mirrors.tuna.tsinghua.edu.cn/debian/ buster-updates main contrib non-free deb-src https://mirrors.tuna.tsinghua.edu.cn/debian/ buster-backports main contrib non-free deb-src https://mirrors.tuna.tsinghua.edu.cn/debian-security/ buster/updates main contrib non-free #兰州大学镜像站 deb http://mirror.lzu.edu.cn/debian stable main contrib non-free deb http://mirror.lzu.edu.cn/debian stable-updates main contrib non-free deb http://mirror.lzu.edu.cn/debian/ buster-backports main contrib non-free deb http://mirror.lzu.edu.cn/debian-security/ buster/updates main contrib non-free deb-src http://mirror.lzu.edu.cn/debian stable main contrib non-free deb-src http://mirror.lzu.edu.cn/debian stable-updates main contrib non-free deb-src http://mirror.lzu.edu.cn/debian/ buster-backports main contrib non-free deb-src http://mirror.lzu.edu.cn/debian-security/ buster/updates main contrib non-free #上海交大镜像站 deb https://mirror.sjtu.edu.cn/debian/ buster main contrib non-free deb https://mirror.sjtu.edu.cn/debian/ buster-updates main contrib non-free deb https://mirror.sjtu.edu.cn/debian/ buster-backports main contrib non-free deb https://mirror.sjtu.edu.cn/debian-security/ buster/updates main contrib non-free deb-src https://mirror.sjtu.edu.cn/debian/ buster-updates main contrib non-free deb-src https://mirror.sjtu.edu.cn/debian/ buster-backports main contrib non-free deb-src https://mirror.sjtu.edu.cn/debian/ buster main contrib non-free deb-src https://mirror.sjtu.edu.cn/debian-security/ buster/updates main contrib non-free Debian 11#阿里云镜像源 deb https://mirrors.aliyun.com/debian/ bullseye main non-free contrib deb-src https://mirrors.aliyun.com/debian/ bullseye main non-free contrib deb https://mirrors.aliyun.com/debian-security/ bullseye-security main deb-src https://mirrors.aliyun.com/debian-security/ bullseye-security main deb https://mirrors.aliyun.com/debian/ bullseye-updates main non-free contrib deb-src https://mirrors.aliyun.com/debian/ bullseye-updates main non-free contrib deb https://mirrors.aliyun.com/debian/ bullseye-backports main non-free contrib deb-src https://mirrors.aliyun.com/debian/ bullseye-backports main non-free contrib最后更新命令:sudo apt update sudo apt upgrade
 -
 linux如何让一个程序崩溃后自动重启 思路: 写一个脚本 监控程序的运行状态 没有运行启动运行 已运行不做操作。如果在控制台启动脚本 注意必须 nohup sh xxx.sh &while true do ps -ef | grep "填入你自己的程序名" | grep -v "grep" if [ "$?" -eq 1 ] then ./run.sh #启动应用,修改成自己的启动应用脚本或命令 echo "process has been restarted!" else echo "process already started!" fi sleep 10 done或while : do cd /xxx ulimit -n 819200 stillRunning=$(ps -ef |grep "填入你自己的程序名" |grep -v "grep") if [ "$stillRunning" ] ; then sleep 1 else echo "starting 填入你自己的程序名 process ...." ./run.sh #启动应用,修改成自己的启动应用脚本或命令 sleep 2 fi done
召唤看板娘


